The Month That Was: August

Here we are at the end of August - maybe someone should tell the weatherman that summer's pretty much over, it's 36 with the humidity 'round here, not exactly boot weather!

It's been a busy August here on Omiyage Blogs.  Let's take a quick look back at what we've been up to:

We've shared lots of DIY projects, both our own and from around the web:


Roll on September!  We're excited for a whole new month of wonderful ideas, products and projects to share!

Back to School with imagine1day

We spent last week celebrating Back to School with some project suggestions, a quick and pretty DIY and a special deal or two.  Today, we'd like to celebrate Back to School in a different way.

I want to tell you about a project that has me excited. Too excited to keep quiet!

You see, there are some Vancouverites doing some good for others in a really interesting way. I'd like to introduce you to Adam and Chloe - 2 Canadians who are embarking on (what is likely to be a life-changing) trip called Imagine Ethiopia 2010

Imagine Ethiopia is hosted by imagine1day, a nonprofit organization dedicated to providing children in Ethiopia with primary education.  One school at a time, imagine1day is working towards their goal that all children in Ethiopia will have primary education by 2020.   Prior to departure this September, Adam and Chloe, with 16 others, are invested in raising $100,000 to build a school in Ethiopia.

The logistics?  $100K sustainably completes a school project in Ethiopia and ensures that the community is set up to maintain the school so that no return work is necessary: the community is empowered to look after their own school.

What's interesting about imagine1day is how it empowers its volunteers and allows them to create their own contribution.  Called a creatribution, imagine1day asks its volunteers to get down to the core of what makes them excited, what they are passionate about and to design a project that combines their talents and passions, and enriches their own community. (Sounds pretty great, doesn't it?)

Adam and Chloe?  They're excited about inspiring and leading others; about helping you find the best you.  (And don't we all want to be the best us?)  And their creatributions, Vancouver area events POP and SHIFTED,  certainly reflect this.

POP is a series of events that empowers people to create an ideal vision for their lives and support that vision through solid short and long term goal setting. In the same amount of time that people usually reserve for a trip to the movies, participants will learn how to powerfully design the next ten years of their lives.

SHIFTED, stories of challenge and choice, is an event where 5 successful speakers will share their stories - their entire stories, good and bad.  With a mission to inspire, SHIFTED wants you to leave armed with the knowledge that the challenges you face just might be the pathway to success.  Learn about the speakers here.


I asked Adam why he was inspired to get involved with Imagine Ethiopia 2010.  Here's what he said:

My initial attraction to imagine1day was its model. I loved that people could find individual projects that they believed in and could tangibly choose what they were going to invest in to support. imagine1day's website is broken down so that you can invest in pieces of a school (doors, roof trusses, concrete) and then the organization loops you in on the progress of the project from the perspective of being an investor.

An endowment established by lululemon's Chip and Shannon Wilson in 2007 to cover all overhead and administration costs at imagine1day ensures that all funds donated to the organization go directly to the components that investors donate to projects being completed on the ground in Ethiopia.


So this Back to School season, as we bundle our children off to their (clean, safe, often high-tech) schools, why not help provide Ethiopian children with education too.  Here are a few ways to get involved:

In the Vancouver area, attend Shifted or one of the POP events.
Not in Vancouver?
Visit the imagine1day site and you can donate to Adam and Chloe's goal by investing in a door, roof or floor for the school being built in Tigray, Ethiopia.  Or simply choose a dollar donation you're comfortable with.  Once you invest in the school, imagine1day will keep you updated on the progress of the school and the students - you will see the changes made possible by your investment.

Want to develop your own creatribution?  Click here and read about other creatributions and how you too can get involved.

Looking for a little bit of daily inspiration?  Chloe writes a lovely - and brave - blog about life and learning. Check out her Goals section and you'll be wanting your own 10 year vision too!

Have an interesting project you support?  We'd love to hear about it!  Leave a comment or send us an email.

DIY: Pretty Pencils

With all this talk of back to school, and pencil cases, surely we shouldn't forget something pretty fabulous to put inside!

Without further ado:


These are a simple and gratifying DIY.  We've turned again to our 5x7" Washi Paper Packs for inspiration and come up with a perfect companion project to our Japanese Paper Dolls


For this project, you will need:
  • pencils, preferably round (ours were neon - learn from our mistakes and choose something a bit more neutral, especially when using a lighter coloured paper!)
  • beautiful paper like our Japanese washi
  • Mod Podge (we used Matte)
  • a craft paintbrush 


    Cut your paper into strips approximately 2.5cm / 1" wide and 17.25cm / 7" long.  Standard pencils are approximately 17.5cm / 7" long.  Adjust this measurement to fit the length of the pencils you are using.


    Apply a thin layer of Mod Podge to the wrong / plain side of your chosen paper.

    Carefully roll paper around pencil, ensuring you roll tightly and edge of paper is aligned with the ferrule (that's the official name of that metal band which attaches the eraser to the pencil, we looked it up! ).

    Apply thin layer of Mod Podge to right side of paper to seal.  Ensure seam is well-adhered.  You may need to smooth down seam edge during drying time to make sure it lies flat.


    Allow pencils to dry thoroughly before sharpening.  (We let ours dry overnight.)


    What fun!  We're keeping ours in our storage.it notebook, but these would make a pretty fabulous gift too.  Wrap up a few with a lovely notebook or pencil case, and you've got a great present for someone on your list!

    Visit Omiyage.ca for beautiful Japanese papers and more!

    DIY Paper Crane Cupcake Toppers

    As we posted earlier today, you can find a great post over on The Girl in the Pink Wedding Dress all about incorporating 1000 Paper Cranes into your wedding.

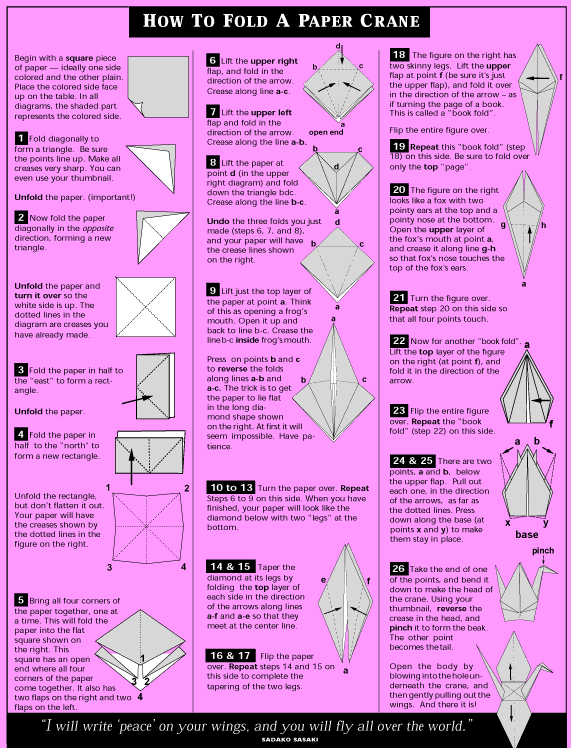
    But we wanted to tell you a little bit more about our DIY Paper Crane Cupcake Toppers!  These are simple, striking and super easy.... once you get your folding down.  So let's get that out of the way:

    via Linares Blog

    For our cupcake toppers, we used 7.5cm / 3 inch origami paper.  This is a standard size of origami paper and (we think) it makes the perfect sized cranes to use atop your cupcakes. (You can fold your cranes out of regular paper, but we find, especially when folding small cranes, it can be too thick to work with.)


    For the first look, we started with our Peace Crane Aizome paper for cupcake wrappers, and shades of blue paper from our 50 Colour origami paper set.  Oh, and some toothpicks!


    Once the cranes were folded, we cut cupcake wrappers out of the Peace Crane Aizome using this pattern. (You know - 'cause they're all the rage.  No one serves naked cupcakes anymore!)


    In the tutorial over on The Girl in the Pink Wedding Dress, we said that you should glue your crane to the toothpick.  But we actually found that with our cranes the glue wasn't necessary.  When you fold a paper crane, a small hole is created on the bottom of the crane.  Ours was the perfect size to hold the toothpick pretty securely.  Anyway, glue or no glue, attach your crane to the toothpick.


    Wrap cupcake wrapper around cupcake and secure.  Insert topper into cupcake!  That's it!  It's easy and pretty too!

    We love the look of the blue origami cranes in different shades of blue perched on top of mounds of fluffy vanilla icing and a cupcake wrapper made of our Peace Crane Aizome paper.


    For a different look, we also put together a pink colour story using patterned origami paper from our Traditional Patterns origami set and solid pink paper for cupcake wrappers.  So pretty!


    Not planning a wedding? We think this project is perfect for all sorts of celebrations.  And don't feel the need to stick to origami cranes... origami butterflies, hearts or flowers would make great toppers too! 


    Check out our selection of origami papers and traditional Japanese chiyogami, aizome and katazome papers on Omiyage.ca.  And if you're looking to incorporate origami cranes into your wedding and need origami paper in a specific colour, send us an email and we'll see how we can help!

    And if you haven't checked out the post over on The Girl in the Pink Wedding Dress... don't forget to do so.  There's lots of great ideas and pretty pictures too!

    Paper Cranes for Cancer Research

    While I was researching paper cranes and drooling over paper crane weddings in preparation for today's post over on The Girl In The Pink Wedding Dress, I stumbled across the most amazing project!


    Toronto based The Wedding Co. is celebrating their upcoming 10th anniversary in a wonderful way.  The Crane Chandelier Project!  Simply, they are collecting origami cranes from engaged and newly married couples all over the world.  For each crane received, The Wedding Co. will donate $0.50 to The Princess Margaret Hospital Foundation for Cancer Research.  (And yes, you can send more than one!)  With a goal of 10,000 cranes by January 2011, there's still time for you to get involved.

    We think that this is such a wonderful way to honour your engagement / marriage and to do a little good at the same time.  Congrats to The Wedding Co. for undertaking such a lovely project and letting the world in on it!  And you?  Here's your chance to get involved and spread a little love and hope while you're at it!

    You can read more about The Wedding Co here.  For more information on the Crane Chandelier Project,  and info on how to get involved click here.

    1000 Paper Crane Weddings

    We've been seeing gorgeous paper crane weddings popping up all over the internet, and we're absolutely in love with the symbolism the cranes bring to your special day!


    Head on over to The Girl In The Pink Wedding Dress this morning to read all about paper cranes and some fabulous ideas for incorporating 1000 cranes into your wedding celebration and decor!

    We've even put together a delicious DIY using paper cranes that would be super sweet for your wedding, or really any celebration.  (Hint, hint: origami + cupcakes = magic!)

    DIY Fabric Book Cover

    I just stumbled upon this easy project, and thought "Aha! Another perfect project for our Japanese fabrics.  Perfect timing for our sale!"

    An step by step tutorial on creating a fabric book cover!


    Check out the tutorial on Zakka Inspired.

    Check out Omiyage.ca for Japanese fabrics... and a selection of Japanese cotton fabrics on sale for 24 hours only!

    Back to School with Cotton Canvas

    As we announced yesterday, we're celebrating Back to School season with daily specials all week long!

    As a companion to our Pencil Case round-up, we're offering a smattering of our fabrics at a special price.

    We've chosen some of our cotton canvas prints, because we think they're perfect for pencil cases, lunch bags, tote bags and all sorts of other Back to School sewing.  We have a limited supply of all these patterns, so get them while they last!

    On sale today in the fabric section on Omiyage.ca:

    Daiwabo Tip Top Elephants


    Kokka Modern Woodland


    Kokka Juicy Apples


    Keep watching this space, our Twitter (@Omiyage_ca) or our Facebook page for daily specials throughout the week.

    This deal is valid until 12 noon EST on Wednesday, August 24th.

    Make Your Own Pencil Case: Project Round-up

    Back to school simply wouldn't be back to school without a fabulous new pencil case filled with unchewed pencils and pens which actually write!  A pencil case is a great little back to school DIY - it's quick, doesn't use a lot of materials, and is something that'll actually get used - a lot!

    So, we've taken a look around the internet and picked our 5 favourite pencil case tutorials.  Happy stitching!

    Cute round pencil case via ikat bag.

    Image: ikatbag


    Compact pencil case.

    Image: Bits and Pieces


    Embroidered pencil case.

    Image: Orange Flower Sketchbook

    Zakka bunny pencil case.

    Image: Amaretto Girl


    Zakka inspired pencil case. 

    Image: Noodlehead


    How about you?  Do you have a favourite pencil case pattern?

    Taking a Moment to Give Thanks

    We love seeing Omiyage popping up all over the place in the big ol' blogosphere!

    Thanks to Monique of Moonrox (fabulous jewellery designed and handmade in Canada) for the sweet post and to Fiona of Cartolina Cards (simply gorgeous stationery designed and produced in BC) for finding and sharing Omiyage and to Lindsay of Magpie and Cake (a deliciously crafty Canadian blog) for her simply charming write-up of Omiyage.

    We read and appreciate every sweet word!  Cheers and happy blogging!

    Back to School with Storage.It

    As August speeds along, and Labour day weekend looms not that far in the distance (yes, that's right, I said it - but you can choose to pretend that summer's gonna last forever - but it's really not, at least not if you're in Canada), and I might have mentioned that the end of the summer brings with it a need to stock up on shiny new things for Fall - a fresh beginning of sorts.  Well, for me anyway!

    So over the course of the week, we're going to have a series of 1-day specials to celebrate Back to School 2010.  (We'll admit that they might not all that practical for your little students - but hey, big students and non-students love Back to School stuff too - even when there's no actual schooling involved!)  So watch this space, our Twitter (@Omiyage_ca) or our Facebook page for daily specials throughout the week.

    Anyway, we thought we'd start with a product that is cute and clever!  storage.it notebooks from Mark's Inc are essentially a notebook and pencil case in one.  Of course, they don't have to be just a pencil case! Depending on the size you choose, you could carry your cell phone, keys, bus schedule, spoon, granola bar ...


    The cover of the storage.it notebooks is a large plastic pocket which zips closed.  The inside of the cover features an extra storage flap, card slots (2 in the small A6 notebook, 3 in the large A5 notebook) and a pen loop.  The included lined notebook is replaceable - which extends the life of your storage.it indefinitely. 


    MARK'S Inc. ( マークス社 ) storage.it ( ストレージドットイット ) ポケット付き  A6 ノート

    Omiyage carries storage.it notebooks in two sizes and three different stripes.  Fabulous, says we!


    Check out our selection of storage.it notebooks on Omiyage.ca  Find them in our Stationery section, under "Notebooks".

    On sale until noon EST tomorrow, August 24!

    Friday Favourites

    Wow, August sure is flying by... and those Autumn feelings are flooding in.  It's that time of year when we're itching for back to school clothes and fresh new notebooks and pens - even if we aren't in school ourselves.  Don't think that feeling fades!

    Anyway, we'll try to capture some of the fading summer-ness this weekend and not spend too much time dreaming of plaid and boots and apples and pumpkins! In the meantime, here's some of the lovely stuff we're loving this week:


    Have a great weekend!  Check back in with us again next week for more crafty projects, pretty Japanese stationery and who knows what else ;)

    Don't Forget A New Baby Card!

    Of course, with all this talk of new babies, we would be remiss not to mention our super cute Welcome New Baby cards from graphic station!

    Available in baby boy blue!


    And baby girl pink!


    These super sweet pop-up cards are full of lovely details.  Ribbon accents, pop-up storks and felt toys too!

    Sentiments include:
    Congratulations on your new baby.
    Welcome to the world.
    Many blessings to your baby.
    Wishing your family a lifetime of happiness.

    What else is there to say but, what a sweet way to welcome a new baby to the world!  Pick them up in Omiyage's Stationery section.

    More Sewing for Baby!

    Today we're back with some more baby project ideas from around the web.  We thought we'd try to inspire you with a little fabric love too.  So, without further ado, a collection of sweet baby sewing projects matched up with fabrics from Omiyage!

    Give this sweet rick-rack blanket from Prudent Baby a retro Scandinavian vibe with our Red Riding Hood print from Kokka (available in yellow too). While you're visiting Prudent Baby, take a peek through their archives for all sorts of great project ideas - for sewers and non-sewers alike!


    After making our first pair of baby shoes, and being overwhelmed by the cuteness level involved, this might just become a sweet go to gift!  We're loving all the baby shoe patterns that we've come across, but these seem the most practical!  Found on The Long Thread, pattern from Maked, these little shoes are reversible (oh, the possibilities!)  Wouldn't they be great in one of Omiyage's elephant prints (available in blue/white, grey/white and natural/pink)?


    And let's not forget about Mum!  How about this cute diaper bag disguised as a messenger bag?  Tutorial found on A Mingled Yarn, via Tipnut.  We think this would be fab in one of our Woodland prints from Kokka.  Find them in the Omiyage Fabric section!


    Or even this great changing pad clutch?  Tutorial found on Small Fry & Co.  Wouldn't it be super cute in one of our Apple Prints from Kokka.  Available in 3 colour ways in the Omiyage Fabric section.


    Do you have any fabulous ideas or go to gifts for baby showers, babies and mommas to be?  This book is on our pick-up list for even more great ideas!  How about you?

    Stamp It: Patterned Onesie

    Here's another quick, easy and super cute project for baby.  Create your own patterned onesies using rubber stamps.  A great way to create a one of a kind gift item!


    Front of Finished Project


    For this project you will need a plain onesie or shirt, rubber stamps, ink pads suitable for stamping on fabric, an iron. It may also be helpful to have a piece of cardboard to place inside the onesie so that you have something firm to press against.

    I used a plain white onesie, stamps from our Kodomo No Kao Springtime Stamp Set, and VersaCraft ink in 2 colours.

    Materials Used for This Project

    How to:

    1. Wash and dry onesie to remove sizing.

    2. Practice stamping your desired pattern on a test piece of fabric.  Ensure you understand the amount of ink and pressure needed to get your desired results.  I found that for each stamp impression, I had to reink the stamp.  When you are satisfied with your test run, begin stamping.

    3. If using, place cardboard inside the onesie.  Choose a firm workspace like a counter or tabletop.  This is not a good project to do on top of your ironing board!

    4. On one side of onesie, simply stamp with your first colour / stamp until desired pattern is achieved.  Allow to dry between each additional colour.  I used the ripple and tadpole stamps from our Springtime Stamp Collection stamped in aqua and lime green for a sweet unisex design.

    5.  Allow the first side of your onesie to dry, then flip over and repeat stamping on second side.

    6. When ink has completely dried, heat set with a hot dry iron.  Iron each section of the printed fabric for about 2 minutes.  For better results, turn the onesie inside out and iron on the inside too.  Use a press cloth if desired. This is an essential step to stop the ink from fading.  It is also recommended that you allow the ink to "set" for a week or two prior to washing. 


    This technique could be applied to all sorts of garments for baby, and there's no need to feel limited to an all over pattern - a simple design on the front of a onesie or t-shirt would be cute too!

    Check out all of the fabulous Kodomo No Kao rubber stamps in Omiyage's Crafty section.

    Kimono Baby Shoes and Matching Onesie

    Yesterday, we talked a bit about the desire to gift handmade baby clothes and necessities.  But to be honest, as much as we'd like to, we don't always have a lot of time to devote to baby gifts.  So, we'd like to share with you some fast, simple project ideas for making your next baby gift extra-special.

    Materials needed for this project

    Ever since spotting these sweet kimono baby shoes on HomeSpun Threads, I knew that I would need to make them.  Not want.  Need!  Combining tiny little shoes with an elegant kimono wrap construction, just one look and I was sold.  Luck would have it that Aimee Larsen, the designer of these wee shoes, is also kind enough to share her pattern.  Find it here!


    Baby Kimono Shoes in Cute Cosmo Bubbles Fabric

    Aimee's Kimono Baby Shoes are really simple to construct.  You just need the pattern, 2 or 3 coordinating fabrics and some appliqué adhesive (I used Heat 'n' Bond Lite).  For the uppers, I chose a cute Cosmo print, available on Omiyage.ca (but be warned, we only have a little bit of this fabric, and when it's gone it's gone!), an Echino print for the soles and some lovely soft turquoise jersey for the inside of the shoes.  I ended up sewing these by hand but imagine that on a machine, this project would take you under an hour.

    Complete kimono baby shoes & appliquéd onesie

    Of course, sweet little shoes deserve a matching outfit - don't they? Or at least a matching onesie.  My first experience with appliqué, and I'm pretty smitten already!

    To make your own appliqued onesie to match those new shoes, you'll need a onesie, Heat 'n' Bond Ultra Hold or another appliqué adhesive, fabric of choice.

    1. Wash, dry and press onesie and fabric to remove sizing and allow for any shrinkage.

    2. If you want your appliqué to be in a specific shape, cut that shape out of the appliqué adhesive.  I skipped this step since my design uses the bubbles or circles already found in the fabric design.  If you would like to create a similar necklace effect by cutting circles out of fabric, simply cut a piece of adhesive slightly smaller than the piece of fabric you will be using.

    3. Follow the directions on the appliqué adhesive packaging and iron the adhesive to your fabric.  Allow to cool.

    4. When cool, cut to the desired shape.  I cut around the bubbles in the Cosmo fabric - you can recreate the look of my project by cutting circles of various sizes from your fabric.

    Close up of appliqué layout

    5.  Determine your desired layout on the onesie - I went with a faux necklace look. Follow the directions on the appliqué adhesive packaging and iron the appliqué onto the onesie.  If using multiple pieces, place and iron one at a time. Allow to cool.  That's all!

    Finished!

    After doing a fair amount of appliqué research online, I determined that, while it is better to stitch around your appliqué, you can skip this step by using the Ultra Hold adhesive.  You may find that the edges of your appliqué start to fray - many people enjoy this look, if you do not, use a Lite appliqué adhesive and sew around the edges of the appliqué.  If you choose not to sew around the edges, and over time the edges of your appliqué start to come up, you should be able to press them down again following the directions on the adhesive.  I would also recommend using Fray Check around the edges of the no-sew appliqué - you know, to held keep fray in check!

    Regardless of whether you choose to sew or not to sew, appliquéd garments should be washed in cold water on the Delicate cycle and tumble dried low on the Delicate cycle.

    Check back with us tomorrow for another project idea for baby!  Check out Omiyage's fabric section for more great Japanese fabrics!

    Omiyage and Make+Do Surprize Pack

    Our first ever Giveaway was a success... and we did so enjoy reading through everyone's comments.  Love to know what others love!

    Austen published the winners yesterday.  And we wanted to give you a sneak peek of the prize before we pack it up and send it off to the lucky winner!


    The Surprize Pack includes a 5x7" Washi Variety Pack, an Atelier LZC Paris notebook, 2 packs of graphic station Glitter Stickers, and 3 postcards designed by watercolour artist Sachiko Iwabuchi.  The retail value of this pack on Omiyage.ca is $21.00.  We think that's a pretty fine deal for all that papery goodness!

    Oh, and we're slipping in one of our sweet Japanese Paper Dolls, as featured on Whip Up and Craftgawker You can find the tutorial here. 

    Babies on the Brain!

    It seems inevitable, doesn't it, that one day you look around you and you're surrounded by a veritable baby boom.  Brand new babies, pregnancy announcements, shower invites.  We've found ourselves with babies on the brain - but not for us, not yet anyway - Omiyage is our baby for now.

    But there's just something about all the accoutrements surrounding new babies.  Wee little shoes that can make even the strongest man swoon. Sweet little baby doll dresses that kick our biological clocks into overdrive. The softest of materials that we all long to be cocooned in.  Oh baby!  

    And aren't some of the best presents the ones with a little handmade flair? This week we'll be looking at some simple crafty projects to turn an ordinary baby gift in an extraordinary one!

    But first, here's some sweet baby projects we're loving from around the web.  

    Heather Bailey's Bittie Booties

    Martha Stewart Living's Washcloth Duckies


    Aesthetic Nest's Cut Chenille Baby Blanket via Li'l Magoolie


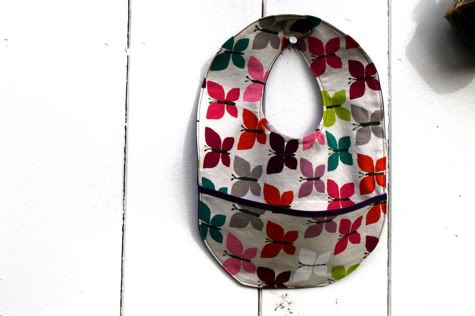
    Prudent Baby's DIY Pocket Bib

    Lotta Jansdotter's Snuggler via Craftzine

    Visit us again tomorrow for our first baby-licious craft idea!